
MySQL Server
Introduction
We previously wrote about protecting your MySQL server. Now, let’s explore a practical topic: setting up MySQL with DataSunrise for masking and audit tests. This process is similar for all supported databases and storages. You can find our full database coverage in our user guide.
In this article, we’ll install MySQL server on Ubuntu 24.04 Server (EOS in June 2029) and create an audit rule in DataSunrise. We assume you already have DataSunrise 10.1 server installed. If not, download a free trial from our website and follow our installation guide. The guide covers common operating systems like Windows, Oracle Linux, CentOS, and Ubuntu.
For simplicity, we’ll disable the firewall on the MySQL Server machine. Note that this isn’t recommended for production setups.
Case Setup
Below you can see the diagram showing the components of the test setup.
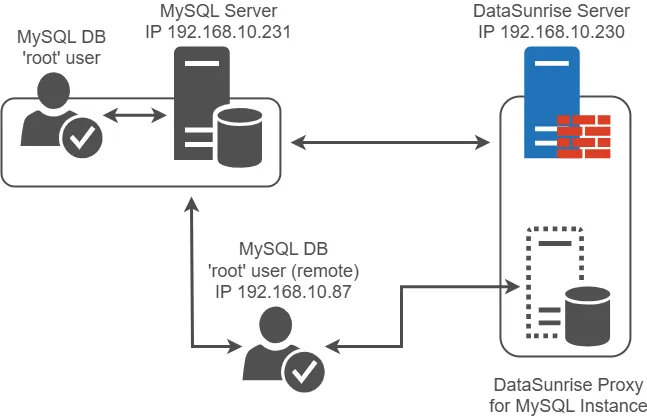
Our setup includes three machines with distinct IP addresses:
- 192.168.10.231 – MySQL server
- 192.168.10.230 – DataSunrise server
- 192.168.10.87 – Database user’s PC
These machines should ping each other successfully.
During MySQL server setup, we create a ‘root’ user. This user can connect remotely from two hosts:
- 192.168.10.230 – To set up DataSunrise proxy
- 192.168.10.87 – For direct database connections
Note: Audit and masking don’t work with direct connections.
Install database server in Ubuntu
A quick tip before we start: Use MobaXTerm to simplify command entry. Follow these steps:
- Ensure SSH is available on your Ubuntu server.
- Open a console session in MobaXTerm.
- Connect to your server via SSH in MobaXTerm.
- Copy and paste commands directly into the SSH terminal.
This approach saves time and reduces typing errors. It works if you enabled SSH during Ubuntu installation or added it later. Now let’s proceed to the database installation.
1. Update package lists:
sudo apt update
2. Install MySQL Server:
sudo apt install mysql-server
3. Start MySQL service:
sudo systemctl start mysql
4. Enable MySQL to start on boot:
sudo systemctl enable mysql
5. Secure MySQL installation:
sudo mysql_secure_installation
This step runs security configuration scripts. You’ll answer questions with Y or N. Your answers won’t affect our installation because:
- We’ll configure remote access ourselves.
- We don’t use anonymous users.
- We don’t need example databases.
6. Log in to MySQL as root:
sudo mysql
Create a new root user with remote access from 230 (remote access to DB through proxy) and 87 (direct remote access to DB) hosts:
CREATE USER 'root'@'192.168.10.230' IDENTIFIED BY 'your_strong_password';
GRANT ALL PRIVILEGES ON *.* TO 'root'@'192.168.10.230' WITH GRANT OPTION;
FLUSH PRIVILEGES;

CREATE USER 'root'@'192.168.10.87' IDENTIFIED BY 'your_strong_password';
GRANT ALL PRIVILEGES ON *.* TO 'root'@'192.168.10.87' WITH GRANT OPTION;
FLUSH PRIVILEGES;

EXIT;
7. Edit MySQL configuration file:
sudo nano /etc/mysql/mysql.conf.d/mysqld.cnf
8. Change the bind-address line to 0.0.0.0 (MySQL accepts connections from any network interface):
bind-address = 0.0.0.0
9. Restart MySQL service:
sudo systemctl restart mysql
10. Disable firewall:
sudo ufw disable
We now have MySQL Community Server installed on Ubuntu 24.04 with remote root access from 192.168.10.230 and 192.168.10.87.
I installed MySQL from Ubuntu Server repositories. Here’s what I got: MySQL version: 8.0.37 with end of support: 2026
You can verify this information yourself. Just run mysql -V command:
DataSunrise and Test Data Setup
Database Instance
Adding a database instance:
- Go to Configuration > Databases.
- Add your database details.
- Click the Test button to check the connection.
- If successful, the Save button will appear at the bottom.
- Click Save to finish.
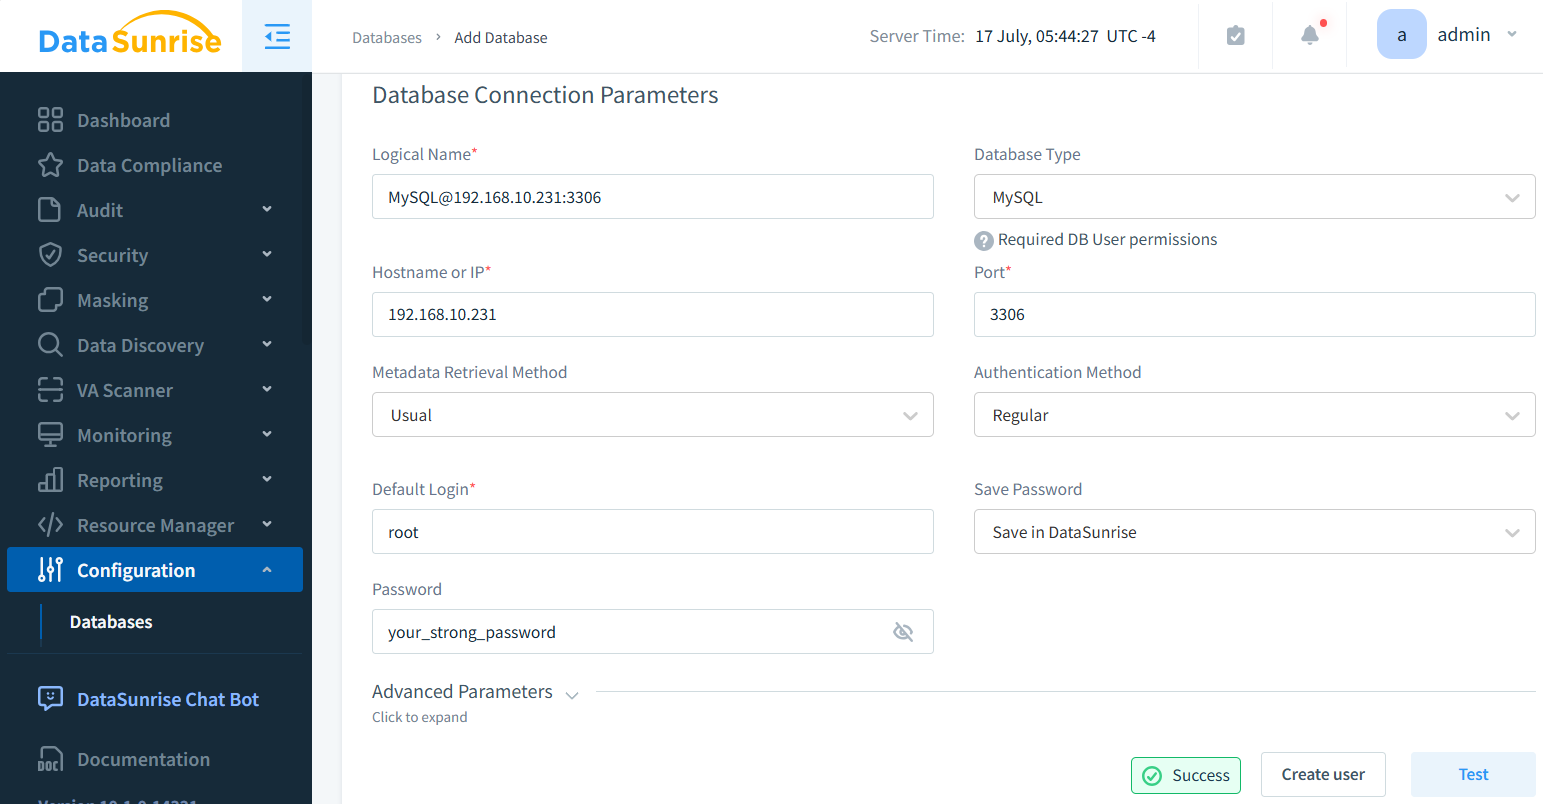
Pay attention to the proxy port number (figure below). It often differs from the database port, typically being the database port plus 1,2, etc (depending on how many MySQL database instances there are). You’ll need this information to connect to the database proxy later.

Working On The Database Contents: Create and Populate a Table
We now have the database instance ready for security tests. You can use the sample SQL below to create a database with sensitive data. If you need more data, visit Mockaroo.com. This website allows you to generate up to 1000 rows of data for free in SQL format. The generated SQL can include CREATE TABLE statements, making it easy to set up your test database.
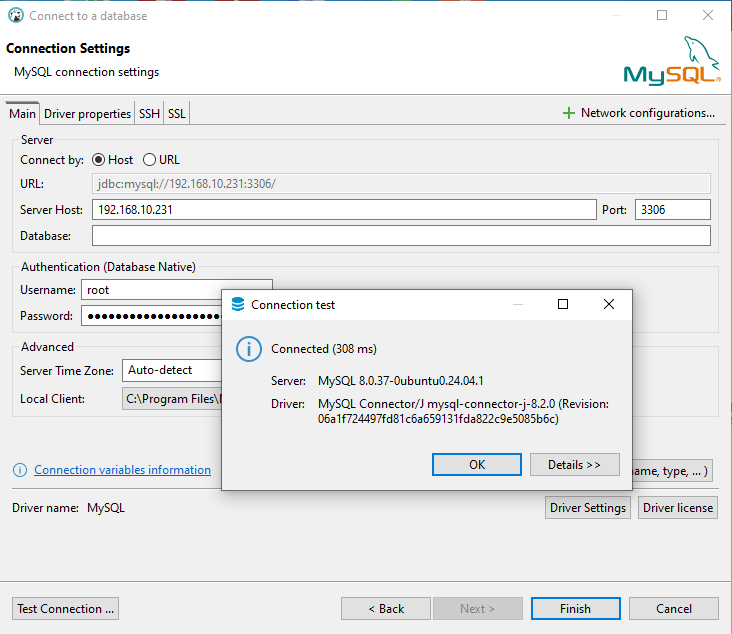
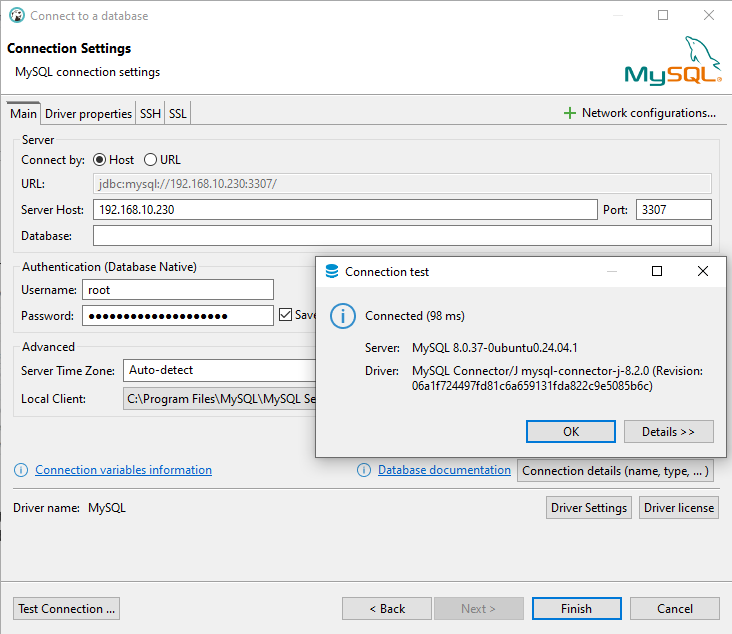
You can connect directly to the installed MySQL server using DBeaver Community Edition. Use the server’s IP address (192.168.10.231) and port (3306). If needed, enable “Allow public key retrieval” in the Driver properties. To test the connection, click the Test button. Once successful, click Finish to complete the DBeaver Connection setup.
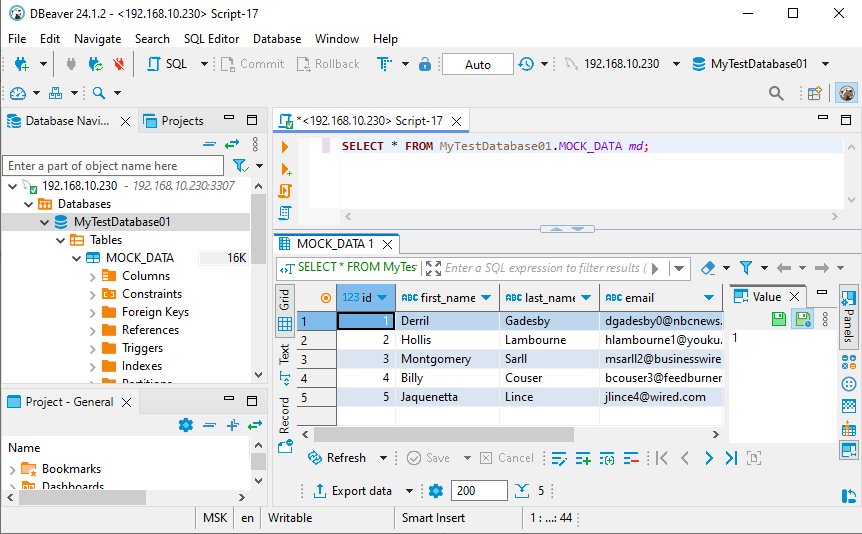
Create a database (like MyTestDatabase01 on the figure below) in MySQL server using either DBeaver’s graphical interface or the mysql tool in MobaXTerm’s SSH terminal. Then, add the following table to your new database:
create table MOCK_DATA (
id INT,
first_name VARCHAR(50),
last_name VARCHAR(50),
email VARCHAR(50),
gender VARCHAR(50),
ip_address VARCHAR(20)
);
insert into MOCK_DATA (id, first_name, last_name, email, gender, ip_address) values (1, 'Derril', 'Gadesby', 'dgadesby0@nbcnews.com', 'Male', '150.125.29.137');
insert into MOCK_DATA (id, first_name, last_name, email, gender, ip_address) values (2, 'Hollis', 'Lambourne', 'hlambourne1@youku.com', 'Male', '214.158.239.175');
insert into MOCK_DATA (id, first_name, last_name, email, gender, ip_address) values (3, 'Montgomery', 'Sarll', 'msarll2@businesswire.com', 'Male', '112.76.38.229');
insert into MOCK_DATA (id, first_name, last_name, email, gender, ip_address) values (4, 'Billy', 'Couser', 'bcouser3@feedburner.com', 'Male', '18.60.157.23');
insert into MOCK_DATA (id, first_name, last_name, email, gender, ip_address) values (5, 'Jaquenetta', 'Lince', 'jlince4@wired.com', 'Female', '101.128.60.87');
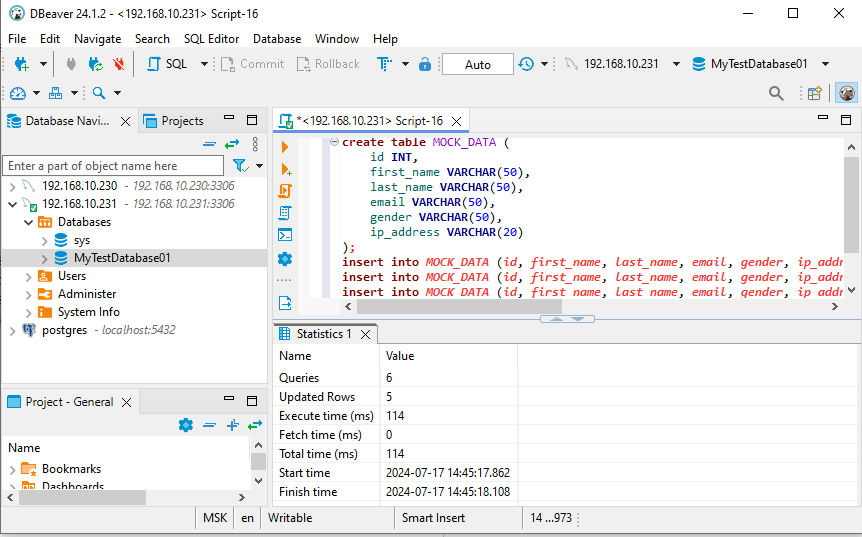
On the figure above you can see the direct database connection to the 192.168.10.231 (a machine with MySQL server).
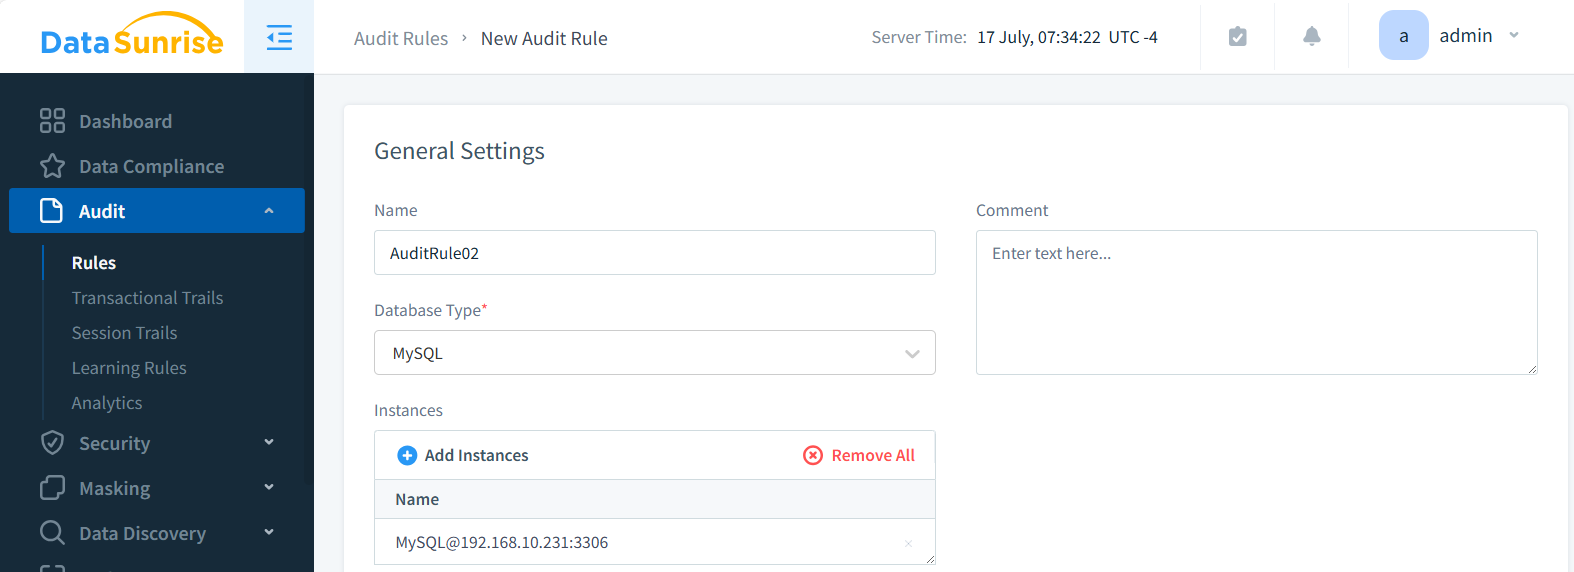
Audit Rule for Instance Monitoring
Now we create an Audit rule for MySQL instance in DataSunrise:
And select proper rows we just created directly few steps ago:
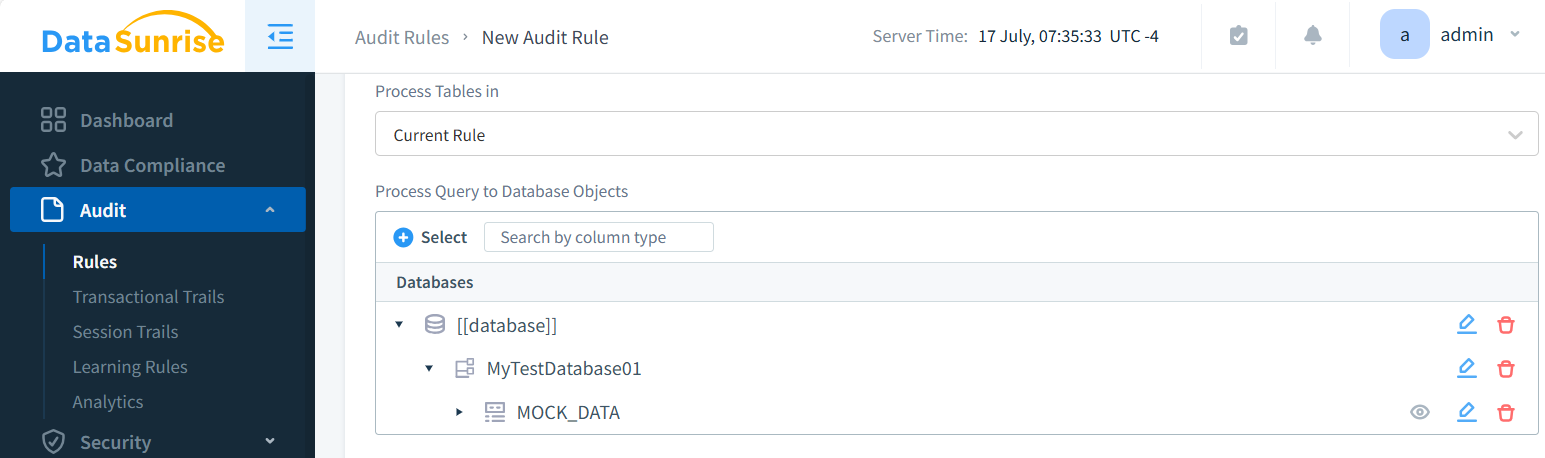
Don’t forget to Save rule.
Monitoring DBeaver Connections through Proxy
Create a DBeaver connection to the proxy the same way you created a direct one. The IP will be 192.168.10.230 and port number is 3307.
And make DBeaver SELECT for this MOCK_DATA table:
Now as you can see we connected to MySQL database through DataSunrise proxy. That’s why address is 192.168.10.230.
Now Transactional Trails contain the event for your SELECT query:
Conclusion
In this article, we’ve covered the essential steps for setting up MySQL server with DataSunrise on the latest Ubuntu Server. We:
- Installed and configured MySQL
- Connected the database to DataSunrise
- Established remote connections, both direct and through proxy
- Demonstrated basic auditing with a Transactional Trail event
This setup is just the beginning. DataSunrise offers much more, including advanced data masking, robust security rules, and comprehensive data discovery.
For organizations looking to protect their data, whether on-premise or cloud-based, we recommend scheduling an online demo with our team. DataSunrise stands out with its extensive database coverage and intuitive web-based interface, offering both granular and policy-based control for your data assets.
Explore how DataSunrise can enhance your data security strategy and help you meet compliance requirements effectively.
