Integrating Snowflake with Looker

Introduction
Snowflake, a cloud-based data warehousing platform, and Looker, a modern business intelligence and data visualization tool, are two of the most popular tools for data analytics today. Integrating Snowflake and Looker allows organizations to leverage the power of Snowflake’s scalable, flexible data storage with Looker’s intuitive data exploration and dashboarding capabilities.
In this article, we’ll cover the basics of using Snowflake with Looker, including how to set up the integration, manage users and roles, implement row-level security, use Looker’s LookML modeling layer with Snowflake, and apply data governance best practices. By the end, you’ll have a solid foundation for building a modern analytics stack with Snowflake and Looker.
Setting Up the Snowflake Looker Integration
The first step is to connect your Snowflake account to Looker.
Here’s how:
- In Looker, go to Admin > Connections and click “New Connection”.
- Select “Snowflake” as the dialect.
- Enter your Snowflake account URL, username, and password.
- Select the default database, schema, and warehouse to use.
- Test the connection and save.
For example:
Connection Name: My Snowflake Connection
Dialect: snowflake
Host: myaccount.snowflakecomputing.com
Database: MYDB
Schema: PUBLIC
Warehouse: MYWH
Once the connection is set up, Looker can now query data stored in your Snowflake account. The next step is to create a LookML project to model and explore this data.
Modeling Snowflake Data in Looker Using LookML
LookML is Looker’s modeling language for describing the schema of your database in a version-controllable way. Instead of writing SQL queries, you define your data model in LookML and let Looker generate optimized SQL for you. This promotes reusability and consistency across your data team.

Here’s an example of a simple LookML view for a users table in Snowflake:
view: users {
  sql_table_name: MYDB.PUBLIC.USERS ;;
  dimension: user_id {
    primary_key: yes
    type: number
    sql: ${TABLE}.ID ;;
  }

  dimension: name {
    type: string
    sql: ${TABLE}.NAME ;;
  }

  dimension: email {
    type: string
    sql: ${TABLE}.EMAIL ;;
  }

  measure: count {
    type: count
  }
}
This view maps to the USERS table in Snowflake and defines dimensions and measures that can be used in Looker’s Explore section to build charts and dashboards.
Some key LookML concepts to understand when modeling Snowflake looker data:
- Views map to tables or derived tables
- Dimensions map to columns and can be used for grouping and filtering
- Measures are aggregations like COUNT, SUM, AVG
- You can define relationships between views that Looker will use to automatically join tables
Looker automatically handles generating the optimal SQL dialect for the Snowflake database it’s connected to. This abstracts away the complexities of the underlying database and allows analysts to focus on asking questions and getting insights.
Managing Roles and Users in Snowflake and Looker
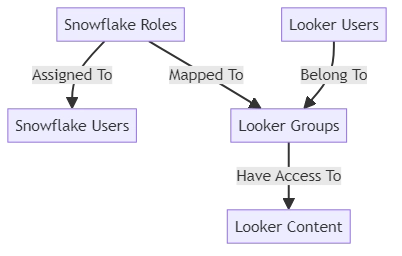
When configuring Snowflake looker for your organization, it’s crucial to properly manage roles and users to ensure data access is restricted appropriately. Snowflake provides extensive role-based access control, and Looker allows you to assign Snowflake roles and privileges to Looker groups.
Snowflake Roles
In Snowflake, roles are the foundation for privileges and access control. Some key concepts:
- Roles can be assigned privileges to specific databases, schemas, tables, and views
- Roles can be assigned to users and other roles
- Snowflake has several system-defined roles like ACCOUNTADMIN, SYSADMIN, SECURITYADMIN
- It’s best practice to create custom roles specific to your organization’s needs
For example, to create an ANALYST role that can read data in the MYDB database:
USE ROLE SECURITYADMIN;
CREATE ROLE ANALYST;
GRANT USAGE ON DATABASE MYDB TO ROLE ANALYST;
GRANT USAGE ON ALL SCHEMAS IN DATABASE MYDB TO ROLE ANALYST;
GRANT SELECT ON ALL TABLES IN DATABASE MYDB TO ROLE ANALYST;
GRANT SELECT ON FUTURE TABLES IN DATABASE MYDB TO ROLE ANALYST;
This role can now be assigned to Snowflake users or groups that need read-only access to data in MYDB for analysis purposes.
Looker Roles and Groups
In Looker, you assign roles and privileges to groups, which are collections of Looker users. Snowflake roles can be mapped to Looker groups to extend Snowflake’s access control into the Looker layer.
To map a Snowflake role to a Looker group:
- Go to Admin > Groups in Looker
- Create a new group or edit an existing one
- Under Roles, select the Snowflake connection and choose the Snowflake role to assign
- Any users added to this Looker group will now have the privileges of the assigned Snowflake role when exploring data through Looker
For example, you could create a Looker group called “Business Analysts”, assign it the ANALYST Snowflake role from earlier, and add all your analyst Looker users to this group. They will be restricted to read-only queries on the MYDB database.
The combination of Snowflake roles and Looker groups provides a powerful way to manage data access across your Snowflake looker analytics stack. By taking a strategic approach to configuring these permissions, you can ensure the right people have access to the right data.
Implementing Row-Level Security with Snowflake and Looker
Row-level security restricts data access at the individual row level based on user attributes. This is important for ensuring users only see data they are authorized to access. Snowflake looker supports row-level security by leveraging Secure Views in Snowflake and User Attributes in Looker.
Secure Views in Snowflake
Secure Views in Snowflake are views that reference other database objects and apply row-level security policies using SQL predicates.
For example, suppose we have a ORDERS table and we only want users to be able to see their own orders. We could create a secure view like:
CREATE SECURE VIEW MY_ORDERS AS
SELECT *
FROM ORDERS
WHERE USER_ID = CURRENT_USER();
The CURRENT_USER() function returns the name of the currently logged in Snowflake user. This secure view will only return rows from the ORDERS table where the USER_ID column matches the current user.
User Attributes in Looker
Looker allows you to define User Attributes which are key-value pairs associated with user accounts. These attributes can be passed into queries to dynamically filter data based on the current user.
To configure a User Attribute in Looker:
- Go to Admin > User Attributes
- Define a new attribute, e.g. “snowflake_user”
- Set the value of this attribute for each Looker user to match their Snowflake username.
Now in your LookML model, you can reference this user attribute in the SQL for your view:
view: orders {
  sql_table_name: MYDB.PUBLIC.ORDERS ;;

  dimension: user_id {
    type: number
    sql: ${TABLE}.USER_ID ;;
  }

  dimension: order_id {
    primary_key: yes
    type: number
    sql: ${TABLE}.ORDER_ID ;;
  }

  dimension: total_amount {
    type: number
    sql: ${TABLE}.TOTAL_AMOUNT ;;
  }

  dimension: order_date {
    type: date
    sql: ${TABLE}.ORDER_DATE ;;
  }

  measure: count {
    type: count
  }

  measure: total_sales {
    type: sum
    sql: ${total_amount} ;;
  }

  # Here we add a filter based on the "snowflake_user" user attribute
  filter: user_filter {
    type: string
    sql: {% condition user_id %} ${user_id} {% endcondition %} ;;
  }
}
With this setup, Looker will automatically add a WHERE clause to any queries against the ORDERS view to filter the results based on the current user’s “snowflake_user” attribute value. The end result is that users can only see their own order data when exploring this data in Looker.
By combining secure views in Snowflake with user attributes in Looker, you can implement granular, dynamic row-level security policies on your data. This is a powerful way to ensure compliance with data privacy regulations and protect sensitive information.
Conclusion
Integrating Snowflake and Looker enables organizations to build a modern, scalable analytics platform. By leveraging Snowflake’s powerful data warehousing capabilities with Looker’s flexible data modeling and exploration layer, data teams can provide secure, self-service access to data across the organization.
In this article, we covered the key aspects of using Snowflake looker together:
- Setting up the Snowflake connection in Looker
- Modeling Snowflake data using Looker’s LookML
- Managing users and roles across Snowflake
- Implementing row-level security with secure views and user attributes
The examples provided serve as a reference for implementing these concepts in your own Snowflake looker environment. By properly configuring roles, privileges, and row-level security, you can ensure that data is accessed securely and appropriately across the organization.
There are many more advanced capabilities of the Snowflake looker integration, such as using Looker’s PDTs (persistent derived tables), leveraging Snowflake’s zero-copy cloning for development workflows, and optimizing query performance. I encourage you to explore these topics further as you build out your analytics stack.
The combination of Snowflake and Looker is a powerful foundation for any data-driven organization. By following best practices around data modeling, security, and governance, you can empower your team to gain valuable insights quickly and securely.